OAuth2 with external OpenID Providers using Membrane
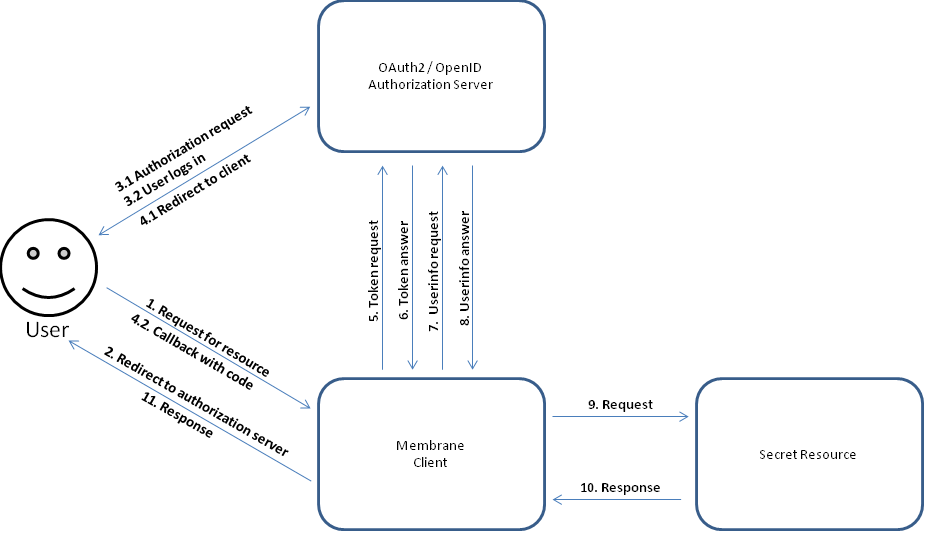
In this tutorial we will see how to communicate with any OAuth2 / OpenID Connect compatible authorization server using Membrane API Gateway to authorize HTTP requests based on the RFC 6749 OAuth 2.0 Authorization Framework, OpenID Connect Core and OpenID Connect Discovery.
This tutorial takes less than 10 minutes to complete. An account with an OpenID provider, internet connection and Membrane API Gateway 6.x or newer is required.
Preparation
Obtain client credentials
Go to your OpenID providers web page and create a client/app and note down the corresponding client id and client secret. How exactly this is done depends on the individual OpenID provider and is out of the scope of this tutorial. See the first part of the Google or GitHub tutorial as an example of this step.
Configure the Membrane client
Note: For this tutorial the Membrane client is preconfigured for the OpenID provider Google, but this will work with any OpenID provider.
Get Membrane API Gateway. Go to the $MEMBRANE_HOME/exmaples/security/oauth2/openid folder in the Membrane API Gateway distribution. Open the proxies.xml for editing and find the clientId and clientSecret attributes in the membrane child element of the oauth2Resource element.
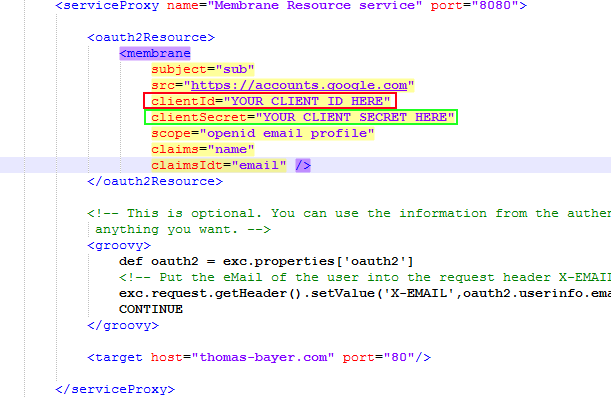
Fill in the client id and client secret. Save and exit the file.
Start the Membrane client
Start Membrane by double-clicking membrane.cmd/.sh.
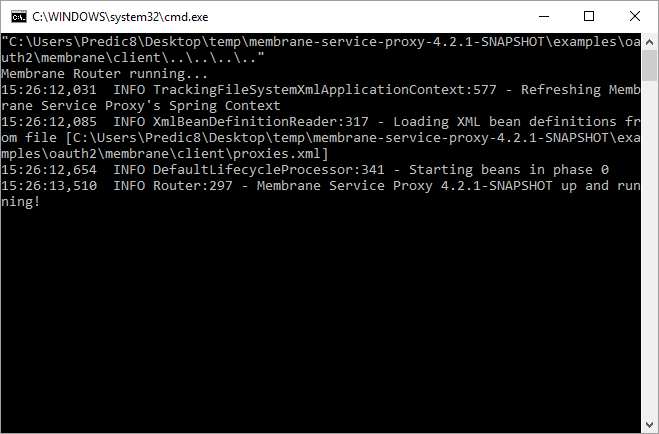
Membrane will start up. As configured, Membrane now listens on port 8080 for incoming HTTP connections. Keep it running in the background. We will now connect to it using a browser.
Perform a sample OAuth2 / OpenID Connect request authorization
Open a browser and go to http://localhost:8080/.
If you aren't already logged in to the OpenID provider, you will be prompted to log in using your credentials. A consent page with relevant information about the shared details will be shown afterward that you need to accept. Both login and consent pages depend on the OpenID provider.
When logged in, you are taken to a protected resource. In this tutorial we used a publicly available web page. You would usually take a resource protected by a firewall so no one can access it directly.
Congratulations, you have successfully completed an OAuth2 / OpenID Connect authorization setup.
Details
Go to the $MEMBRANE_HOME/exmaples/security/oauth2/openid folder in the Membrane API Gateway distribution. Open the proxies.xml.
<router>
    <api name="Membrane Resource service" port="2000">

      <!-- Protects a resource with OAuth2 - blocks on invalid login -->
      <oauth2Resource2>
        <membrane
          subject="sub"
          src="https://accounts.google.com"
          clientId="YOUR CLIENT ID HERE"
          clientSecret="YOUR CLIENT SECRET HERE"
          scope="openid email profile"
          claims="name"
          claimsIdt="email" />
      </oauth2Resource2>

      <!-- Use the information from the authentication server and pass it to the resource server (optional) -->
      <groovy>
        def oauth2 = exc.properties.'membrane.oauth2'
        <!-- Put the eMail into the header X-EMAIL and pass it to the protected server. -->
        exc.request.getHeader().setValue('X-EMAIL', oauth2.userinfo.email)
        CONTINUE
      </groovy>

      <target host="localhost" port="3000" />

    </api>

    <api port="3000">
      <groovy>
        exc.setResponse(Response.ok("You accessed the protected resource! Hello " +
          exc.request.header.getFirstValue("X-EMAIL")).build())
        RETURN
      </groovy>
    </api>

    <api port="9001">
      <adminConsole />
    </api>
</router>
Listing 1: proxies.xml
You can see an API listening on port 2000. It has the oauth2Resource, groovy and target child elements.
The oauth2Resource element is the core of the Membrane client. It has only one child element, the membrane element.
The membrane element has several attributes that are needed for the OAuth2 / OpenID Connect flow. Those are:
Attributes of the membrane element
| Attribute | Name | Description |
|---|---|---|
| subject | the name of the subject claim—usually "sub" | |
| src | the url to the OpenID Provider | |
| clientId | the client id | |
| clientSecret | the client secret | |
| scope | the OAuth2 scopes that are requested, separated by spaces | |
| claims | additional individual claims, separated by spaces | |
| claimsIdt | additional individual claims that are put into the id token, separated by spaces |
The groovy element is optional. It shows how one could further process the OAuth2 / OpenID Connect results. The results of the whole OAuth2 / OpenID Connect flow are available as a property on the exchange. This property is called oauth2.
Here the groovy element defines a procedure to take the email address of the authorized user and put it as an X-EMAIL header into the exchange.
The target element defines the resource the user is taken to when the authorization succeeds.
Help needed?
Do you need any help for this scenario? Email: membrane@predic8.com.